Integrating Tiled maps with Phaser

(Para a versão em português, clique aqui)
Introduction
In this post we'll analyze how to integrate Tiled maps with games made with Phaser, which is a JavaScript framework for HTML5 games; this is an interesting approach for giving more autonomy to the game designer, who can work on the design of the levels on her own and see the results practically in real time.
Some useful links about Phaser and Tiled:
- Phaser API docs: https://photonstorm.github.io/phaser-ce/
- Phaser examples: http://phaser.io/examples
- Tiled docs: http://doc.mapeditor.org/
First of all, let's see how to make a simple map with tile and object layers, bearing in mind the Phaser integration. The tilesets used were obtained here. We'll assume that you already have a basic Phaser project with a state, a player, and the functions preload(), create() e update(), and also basic knowledge about Tiled.
This post is divided on 4 parts:
- Creating a Tiled map
- Importing the map on Phaser
- Adding object layers on Tiled
- Loading object layers on Phaser
All tiles have 16x16 pixels, and all tile numbers are related to the given example; you'll have different values on your project, and it's up to you to make the necessary adjustments. The Tiled screenshots are in Portuguese, but should be relatively easy to follow.
Creating a Tiled map
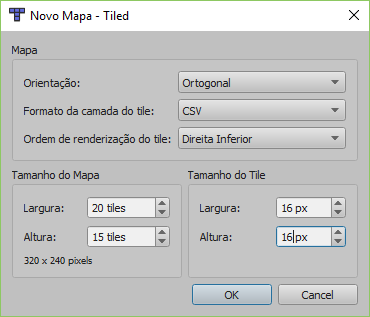
Let's create a map with 20x15 tiles, as the tiles have a size of 16x16 pixels the result is a map size of 320x240.
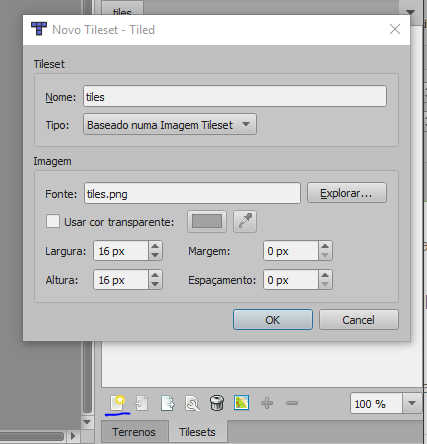
Now let's add an image for using as a tileset. Just press the New Tileset button on the lower right corner, find the tileset file and configure it for 16x16 pixels.
Let's now create a map with 2 tile layers, named Walls and Background. The layers are ordered in such a way that the top layer will be more "in front" of the screen, and you can use the arrows below the layer list to reorder them. A possible map with the layers is shown below:

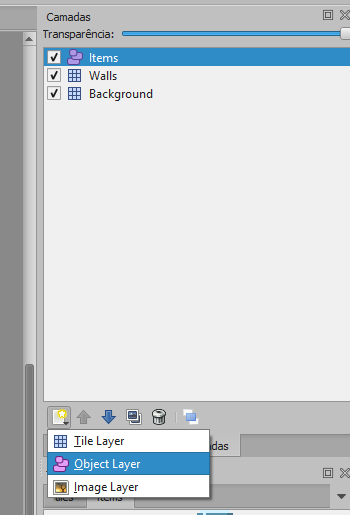
For creating the layers, just click on the underlined button and choose Tile Layer. Important: when you are finished with your map, save it in .json format for importing into Phaser.
Importing the map on Phaser
For this part, assume that the state is defined as shown below and that all files exist on their respective paths:
var GameState = function(game) {};
At the preload() method, let's load the .json file and its tileset:
GameState.prototype.preload = function() {
    // other assets, etc
    this.game.load.image('mapTiles', 'Assets/spritesheets/tiles.png');
    this.game.load.tilemap('level1', 'Assets/maps/level1.json', null, Phaser.Tilemap.TILED_JSON);
}
Afterwards, let's effectively create a map object, at create(), in four steps:
- Create the effective map object;
- Associate the Phaser asset with the tileset with the tileset name given on Tiled;
- Create the layers, ordering from the background to the foreground;
- Specify which tiles will have colliders, for the player to collide with them. The parameters are a tile list, the keyword
true(indicating that we are turning on collisions) and the layer where the collisions should occur.
GameState.prototype.create = function() {
    // other objects, etc
    this.level1 = this.game.add.tilemap('level1'); // step 1
    this.level1.addTilesetImage('tiles', 'mapTiles'); // step 2

    // step 3
    this.bgLayer = this.level1.createLayer('Background');
    this.wallsLayer = this.level1.createLayer('Walls');

    // step 4 will be described soon
}
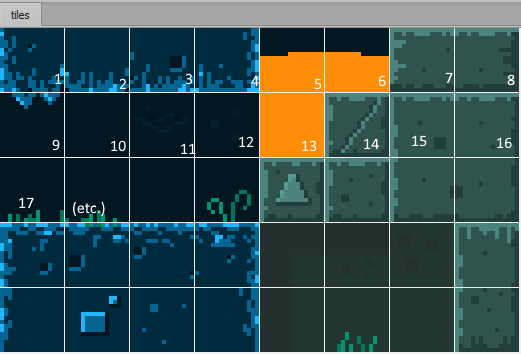
About step 4, notice that all tiles are numbered, starting from the top left tile and increasing from left to right, continuing in the next line. In our example, this should be the numbering:
With that done, as most of the tiles should collide, let's specify collisions in a different way: instead of listing what should collide, let's list what should not collide:
    // st 4, still inside create()
    this.level1.setCollisionByExclusion([9, 10, 11, 12, 17, 18, 19, 20], true, this.wallsLayer);
Important: these tile numbers are related only to the tileset we're using, other tilesets will have different numberings and other tiles that should or should not collide. Other methods of specifying colliding tiles can be seen at Phaser docs here.
Now we'll just have to tell Phaser that the player should collide with the layers Walls. Add the following call at update():
this.game.physics.arcade.collide(this.player, this.wallsLayer);
So, loading the game, this should be the result:
Adding object layers on Tiled
Let's now add an object layer for the player to interact with it, which will be named Items.
Afterwards, let's add a object tileset, which is done in the same way as the stage tileset: just specify the tiles size and the tileset image.
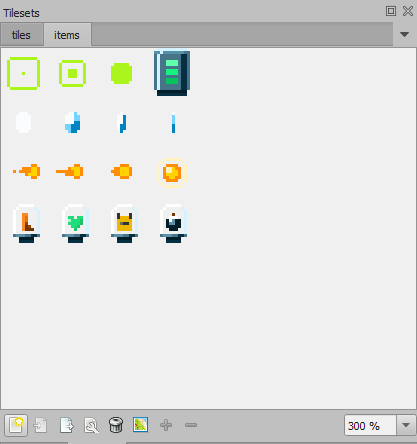
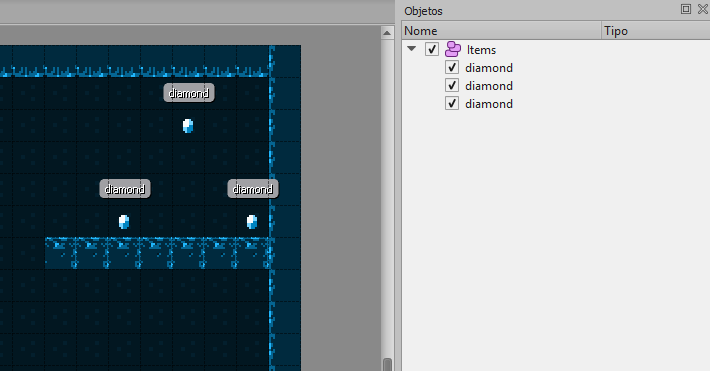
Now click on the Objects tab, above the tilesets, and select the created layer, Items. Now you just have to click on the Insert Tile button and start placing the objects, as demonstrated on the GIF below:
Afterwards, click on each object in the list in the right and double click on the empty space besides the checkbox to give a name to the objects, the same name should be given to all; in our example, they'll be called "diamond".

With all of this done, our work on Tiled is finished; let's go back to the Phaser code and load all those objects.
Loading object layers on Phaser
Let's write on create() the following steps:
    this.diamonds = this.game.add.physicsGroup(); // step 1
    this.level1.createFromObjects('Items', 'diamond', 'items', 5, true, false, this.diamonds); // step 2

    // step 3
    this.diamonds.forEach(function(diamond){
        diamond.body.immovable = true;
        diamond.animations.add('spin', [4, 5, 6, 7, 6, 5], 6, true);
        diamond.animations.play('spin');
    });
At step 1 we create a group for holding these objects, and at step 2 we effectively creating them using the map function createFromObjects(). The full parameters can be seen in the docs, but the essential ones are the first 4 and the last:
- First: Tiled object layer name
- Second: name of the object from the Tiled layer to be instanced
- Third: Spritesheet name loaded on
preload()which has the objects images - Fourth: Which spritesheet frame will be used for the objects
- Last: Name of the group to add the objects.
At step 3 we can see how to apply a function to each group element as a post-processing step, so all the created objects will have the expected behaviour. In the example, we're making the objects immune to external forces (body.immovable = true) and adding an animation. One thing to notice is that the animations are made with Phaser spritesheets, and the frames on them start on 0, instead of 1 like Tiled tilesets.
So, reloading the game, we'll see the objects:
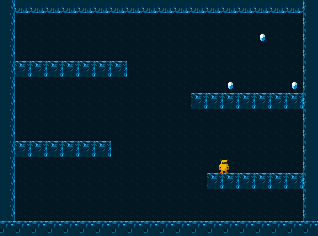
After all this work, what remains is to make the player interact with the objects. Let's now add the collision code on update(), along with a treatment function:
// inside update() function
this.game.physics.arcade.overlap(this.player, this.diamonds, this.diamondCollect, null, this);

GameState.prototype.diamondCollect = function(player, diamond){
    diamond.kill();
}
This code will enable the collision between the player and the diamond group, calling the function this.diamondCollect when a collision happens. This should be the result:
We're using the overlap() function instead of collide() in this case to avoid a loss of player speed at the collision, which would be an undesired side effect on the gameplay.
With that, we have a Tiled map integrated on our Phaser code, with all the necesary objects.