How RGBlues level editor was designed

First of all, have you played RGBlues? No? If you have an Android device, click here and try it out! I’ll wait. Or just watch the video below!
Done? RGBlues is a colorful puzzle from Pxl Squad where you have to hit the targets with the correct color making waves with the central line. It was made with the Unity Engine for the Global Game Jam 2017 and later properly finished and published on the Google Play Store.
The game has six levels, and we had these goals in mind when designing them:
- Match the design of each level to the background music;
- Make a precision-oriented gameplay, where the player should use the precise amount of amplitude to reach all targets;
- Gradually increase the difficulty from one level to the next.
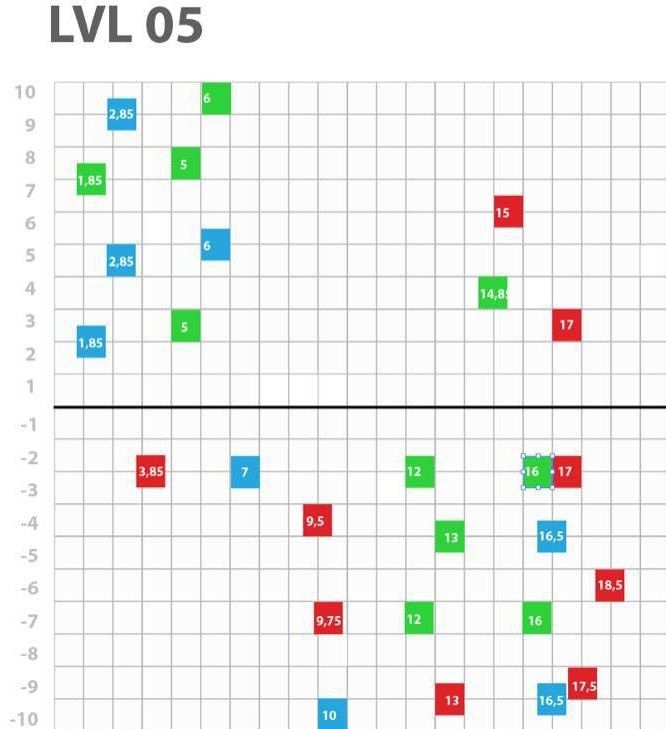
We decided to design the levels using a grid where each cell were equivalent to 1 second, the block number being the spawn time and the vertical position the “height” of the target relating to the central line. See the image below:

On this grid, the color of each block is the color of the target, the number is the spawn time and the vertical position the height where the target should be spawned. So, a red block with the number 15 at height 6.5 should become a red target which will spawn in 15 seconds on the height 6.5 of the stage.
Each level has its own grid, so now we have to figure out how to create all those targets in the proper game. Our first approach for the GGJ was just creating a function called waitAndSpawn() and add each note manually, like this:

This function will call a coroutine that will wait the time specified on the spawn time and then instantiate the prefab in the correct position.
It worked pretty well on the final rush to finish the game: we just had to copy/paste and change the values, and everything would just work. We did three levels and the last level had about 30 targets; kinda long but still manageable. The deadline was 5pm, we packed and submitted the game at 4:58pm — no joke.
Anyway, after some time we started development for the 1.0 version and decided to make three more levels, but with way more targets to put into the levels, looking at 60 to 80 similar lines would make finding errors difficult; also, going back and forth between Unity and Visual Studio and wait some seconds for the code to compile each time something was changed was becoming a time sink. So, we decided for another approach: what if we could edit the level directly inside the Unity editor?
Turns out that the answer was Unity’s ScriptableObjects: we could make a standalone asset for that would contain all the information necessary for building a level and edit it directly on the editor; no more jumping to VS every time something needed to be changed. No more compiling time too, just change the asset and hit play. I’ve done a short overview of ScriptableObjects on another post, that you can access here.
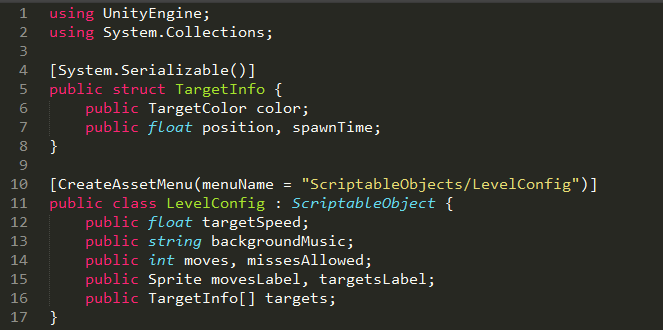
This is what our ScriptableObject for the level looks like:

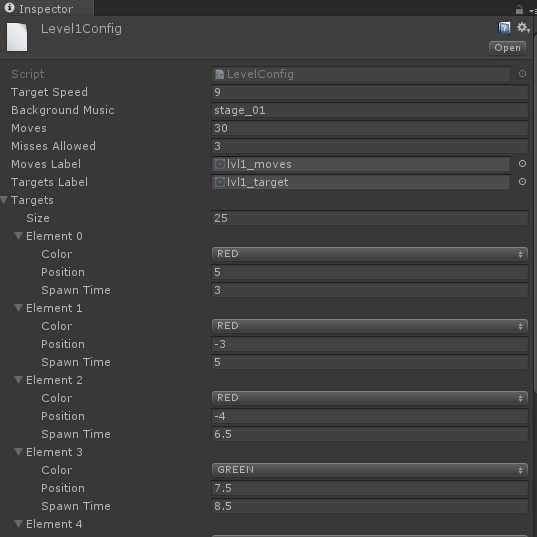
And this is the created asset inside the editor:

That way, we could just fill the initial parameters and then starting add all targets below, specifying the target quantity and then configuring one target at a time. It’s still somewhat a lot of work to configure a list of almost 100 targets, but we could see the results immediately on the level and iterate much faster. The created asset resides on its own standalone file, so it avoids the problem of modifying a GameObject and having a enormous output on git diff to analyze later.
For effectively using this asset on the level loading, we just had to read the correct asset (one for each level) and iterate on the targets, calling the same waitAndSpawn() seen above using the parameters of each one.
One cool aspect of using this editor resource is that as the type TargetColor is an enum with three possible values, it is shown as a dropdown on the editor UI, making it very easy to pick the correct value. This feature is not limited to ScriptableObject assets; a public enum field on a MonoBehaviour would display on the editor in the same fashion.
In the end, we spent some time making and adjusting this level editor, but it saved us quite a bit of time afterwards. Maybe this technique could be overkill for your own project, so it’s up to you to evaluate and decide the best approach. The practical rule that I like to follow is something like this: if you have to do something more than once, maybe a tool for automating at least part of the process will make your life easier.
