Deep dive - GBJAM 14 entry

About the game
Captain O'Greddy's Totally Safe Treasure Hunt is a top-down 2D puzzle/action game, where you must dodge the obstacles, collect all gold coins and rush to the exit on 13 stages. There is no score or time limit, so you can take your time to learn the patterns and go for it; three lives per stage, if you lose all your lives the game is over and everything starts again.
The game runs on a desktop browser, so give it a go and please get back to this article later 😄
Introduction
This article is a deep dive on some aspects of the game I worked on GBJAM 14 as part of the PxlSquad indie collective.
The game was made with the Godot Engine following the rules of the jam, which are some of the characteristics of the GameBoy console:
- 160x144 resolution
- 4 colors palette
- 4 buttons: Select, Start, B, A
We'll talk about the single scene architecture, enemy placement and behaviour and the dialog system.
Single scene architecture
The entire game actually runs in a single scene, with the following tree:
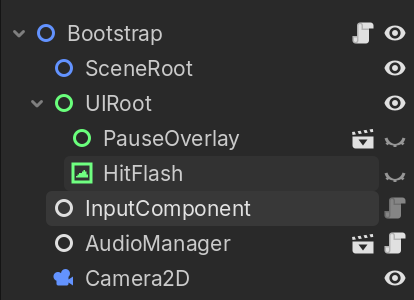
- SceneRoot: all screens and levels are loaded dynamically and placed under this node; on scene change, all the children of this node is cleaned up before the next tree is placed under it.
- UIRoot: Some screen overlays are placed here: the PauseOverlay is what is displayed when the game is paused, and the HitFlash is just a solid color overlay very briefly shown when the player is hit to create a flashing effect.
- InputComponent: All game inputs are read in this component and any other script can read these inputs via an autoload.
- AudioManager: Script that loads and has functions to play any SFXs or music on the game, also available via autoload;
- Camera2D: The main game camera, not strictly needed for this game but helpful when the game is played on fullscreen to keep it centered.
This is what the scene tree looks like when a scene is loaded – the G node is the autoload for holding references to some global nodes, and observe that the Level1 scene is fully loaded under the SceneRoot node:
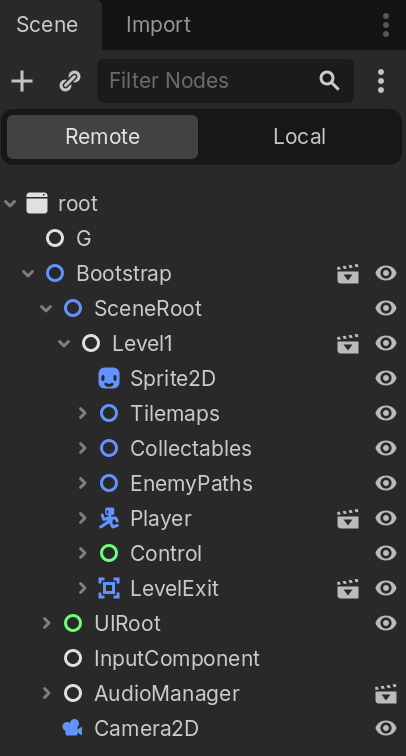
The Player node in included on each level, and the level itself is made with TileMapLayer nodes.
The scenes for the screens and levels are loaded using two simple functions: one for cleanup and other for actual scene loading:
# scene_root is the SceneRoot node referred on the figure above

# First, remove all things on the scene root
func _clean_scene_root():
	for child in scene_root.get_children():
      child.queue_free()

# Then, dynamically load the scene from a path,
# instantiate it and place it under the SceneRoot node;
# path parameter is just a path for a scene on the filesystem,
# like this: res://scenes/ui/game_over.tscn
func _load_scene_from_path(path):
    var resource = load(path)
    if resource:
    	var scene = resource.instantiate()
        scene_root.add_child(scene)
This setup allows the GameManager script (attached to the Bootstrap node) to be always running, regardless of what state the game is in, making it easy to change which screen or level the player is seeing or to pause the game. The InputComponent and the AudioManager also are always running.
Loading the actual game scenes (what the player sees)
Scene management is done via a simple state machine which determines which scene to load at any time and what to initialize, implemented as a match statement, as follows:
# This is called for changing the current game state
func change_state(new_state):
	current_state = new_state
	match current_state:
		GameState.SplashScreen:
			G.current_level = 1
			_clean_scene_root()
			_load_splash_screen()
			G.elapsed_gameplay = 0
			G.audio.play_music("gameplay_loop")
		GameState.Intro:
			_clean_scene_root()
			_load_intro()
		GameState.Levels:
			G.audio.play_music("gameplay_loop")
			_clean_scene_root()
			G.player_lives = 3
			game_paused = false
			pause_overlay.visible = false
(... and so it goes for each scene ...)
The drawback for this approach is that you cannot run the game scenes directly using F6 on the editor, because some global values won't be initialized. There are more than one way to solve this; the chosen solution was to expose the initial state to the inspector, so the game can start on any state needed.
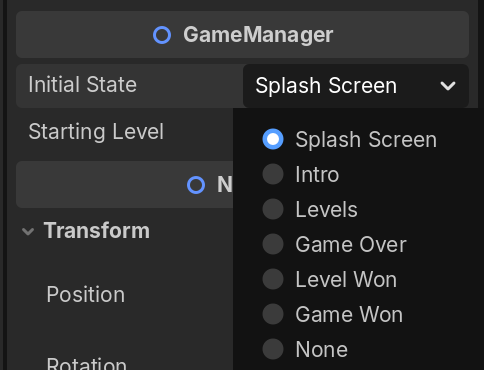
The way this is implemented is that the GameManager just calls change_scene() on the _ready callback when the scene starts with the initial state specified.
@export var initial_state: GameState = GameState.SplashScreen

(...)

func _ready() -> void:
	G.game = self
	G.current_level = starting_level
	G.input = input
	change_state(initial_state)
Enemy placement and behaviour
The design for the enemies is simple and effective: follow a dotted line on the stages, either in a back-and-forth fashion or in a closed loop. These are perfect uses cases for the Path2D and PathFollow2D nodes.
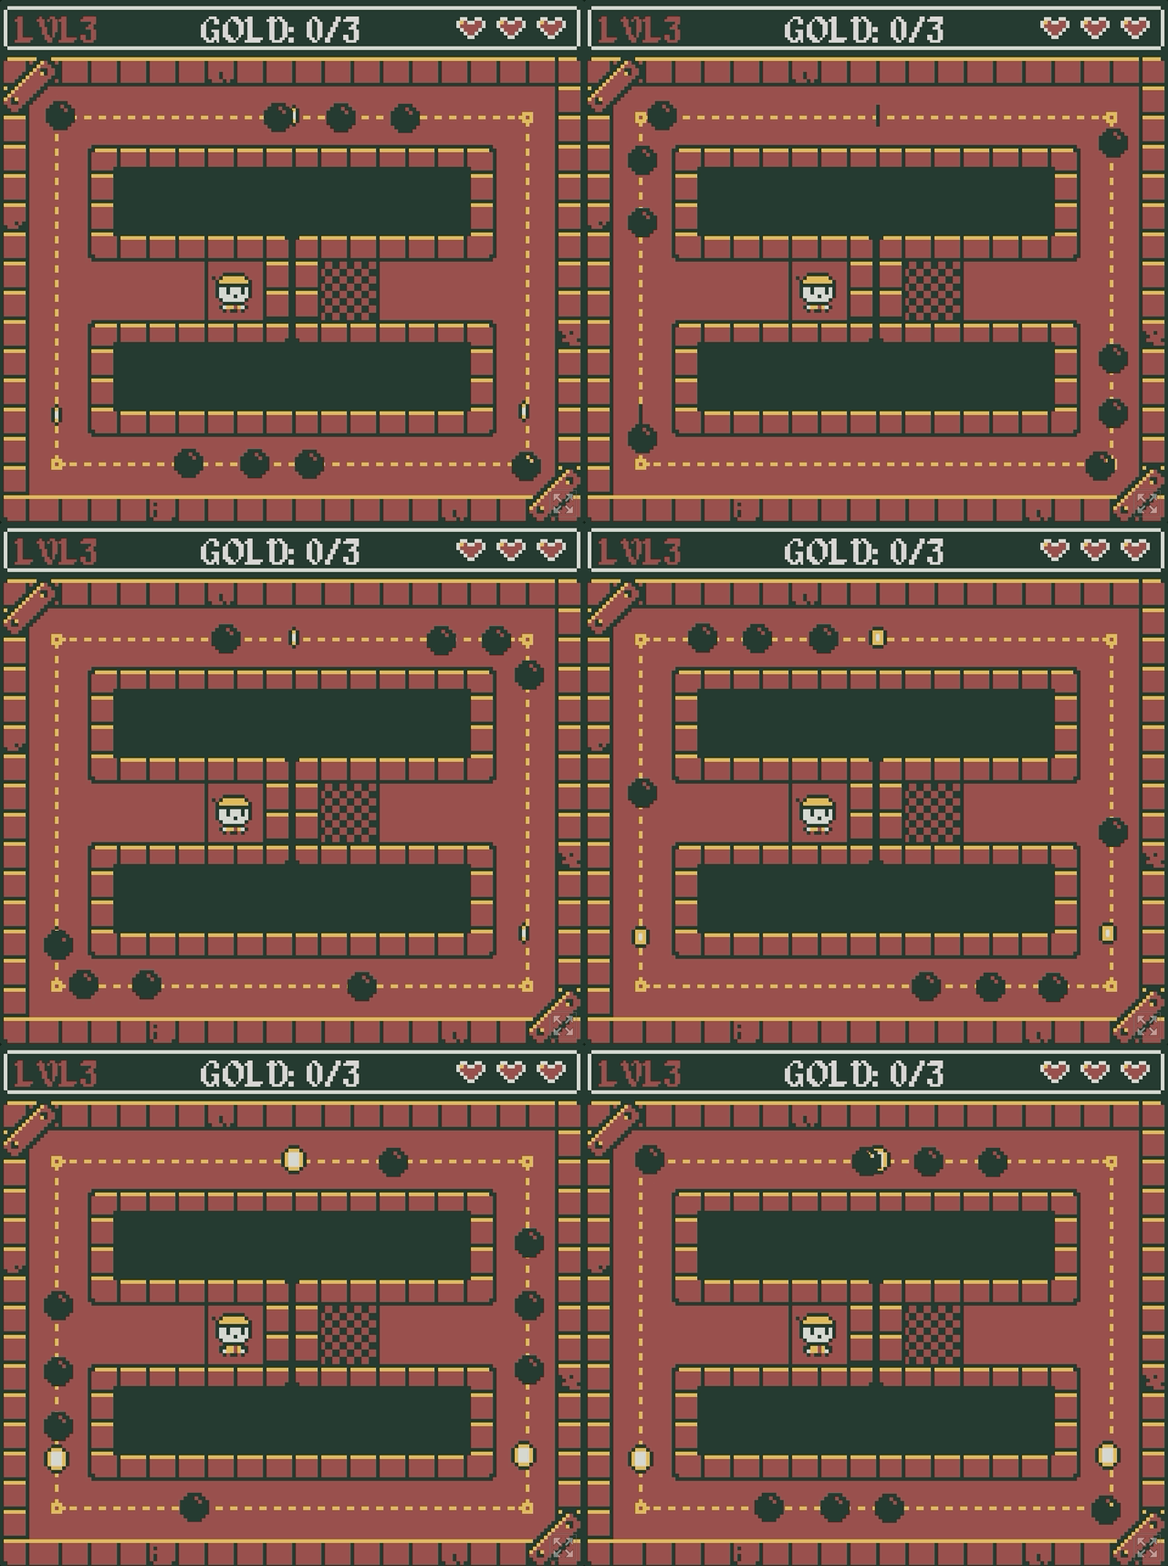
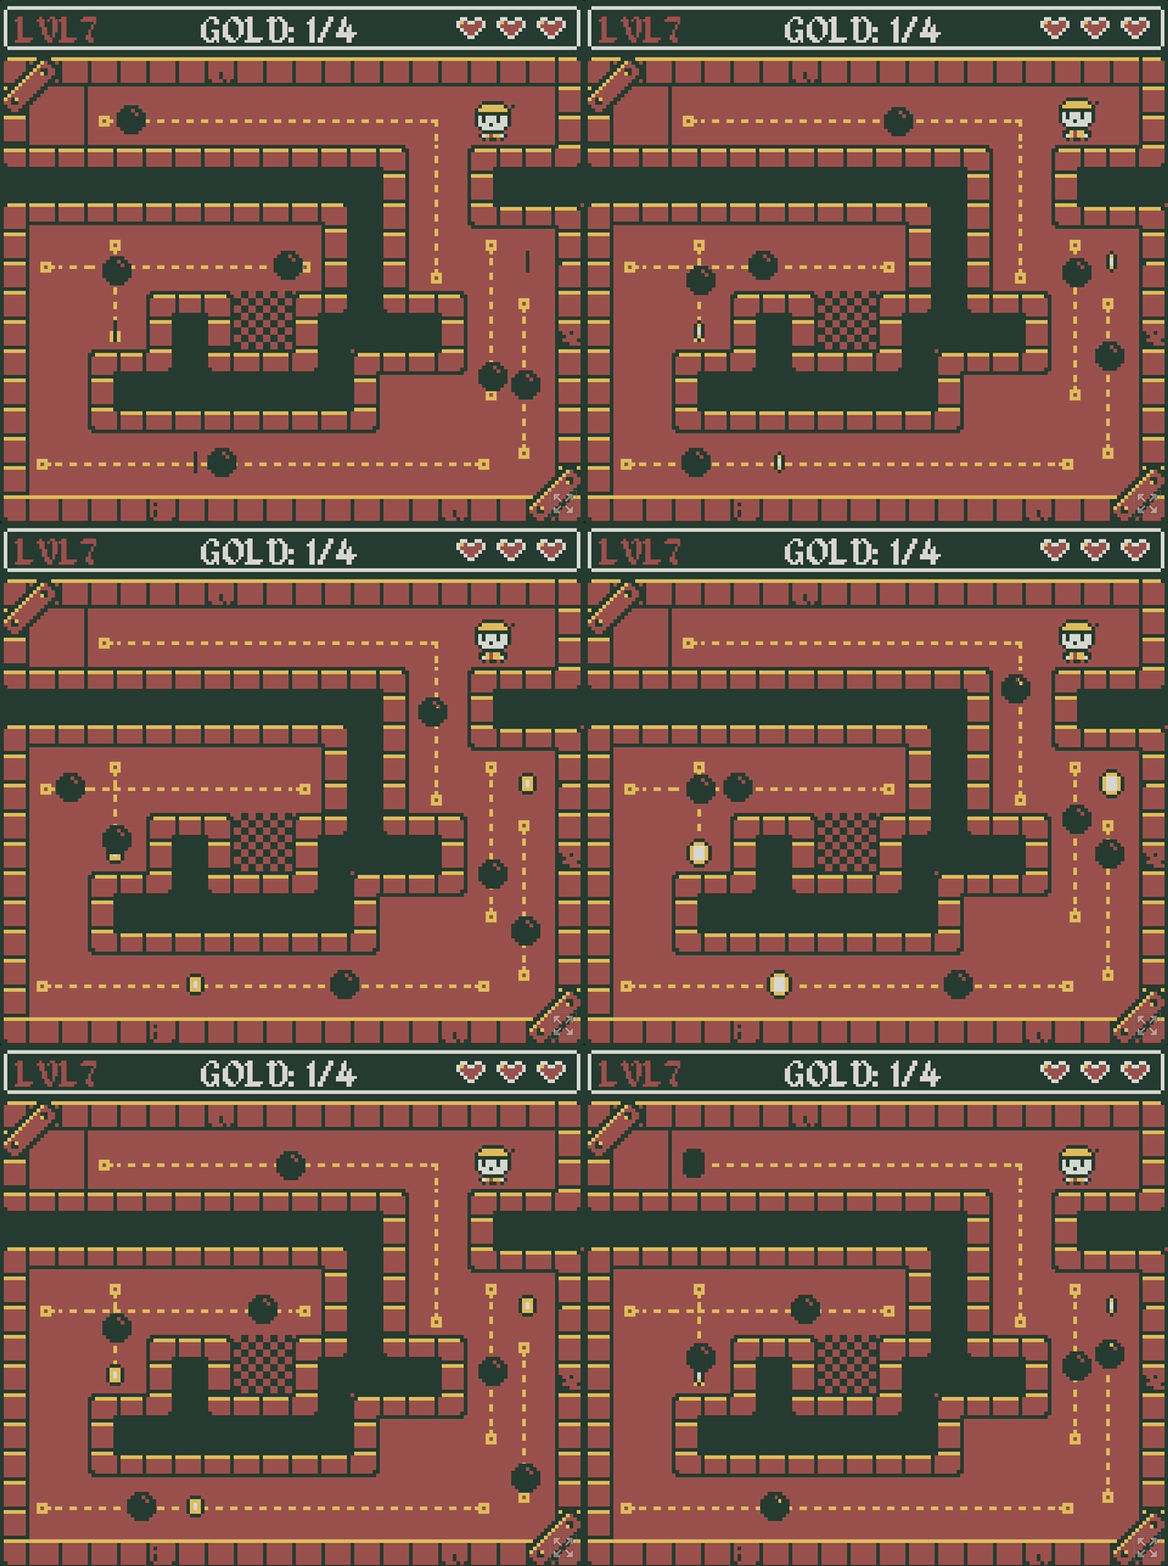
The two types of enemy movement: Repeat and Back and Forth
The scene node setup and custom PathFollower script on the inspector look like this:
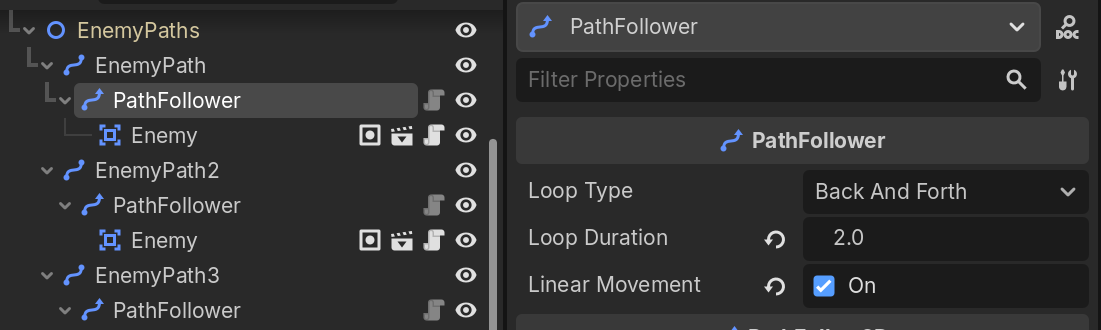
EnemyPath is the Path2D node, which contains the control points that the PathFollower – a PathFollow2D node with a custom script – will follow. Just add some points to the provided Curve2D resource to create the path for the enemy and you're good to go.
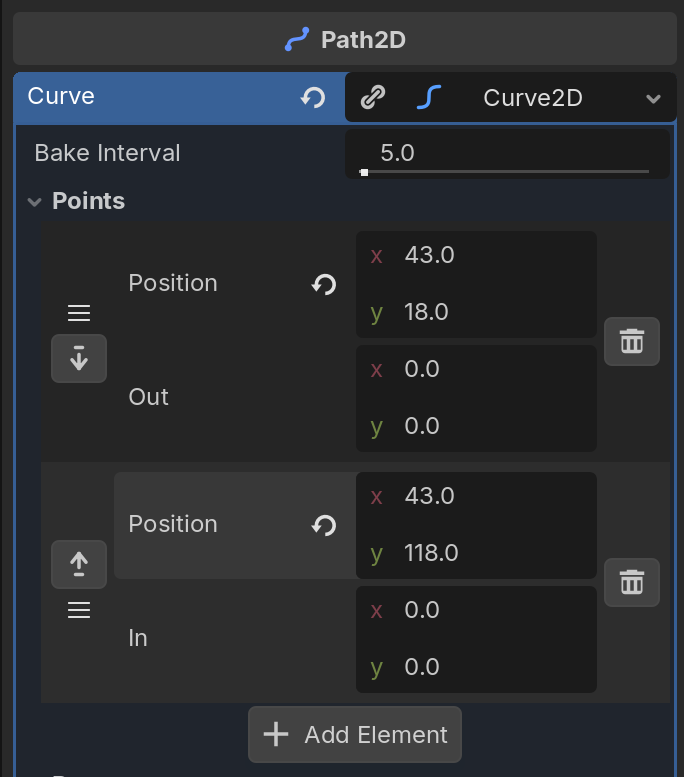
The script itself just manipulates the progress_ratio property of the PathFollow2D node, which goes from 0.0 (first curve point) to 1.0 (last curve point). The order of the points is important, so if the movement seems wrong adjust the order as necessary. See the progress_ratio in action below and the curve points used:
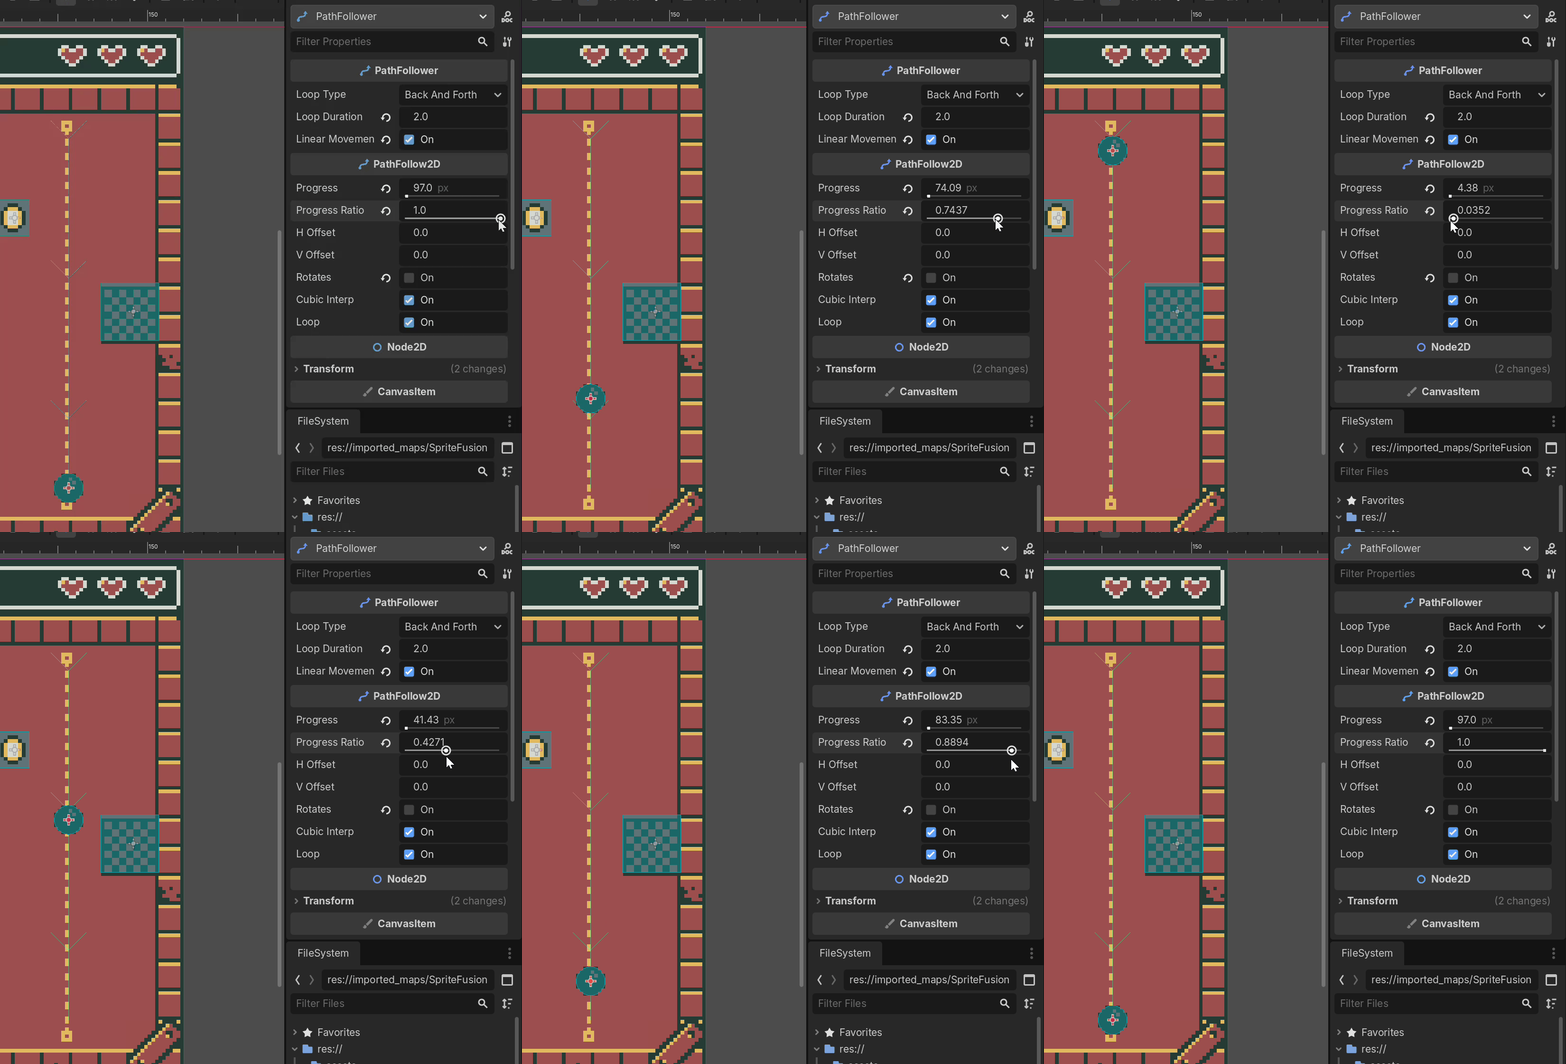
The movement itself is purely linear, and this is the relevant code that drives it:
func _process(delta: float) -> void:
	_elapsed += delta
	if _elapsed > loop_duration:
		_elapsed = 0
        if loop_type == LoopType.BackAndForth:
            # Reverse direction when loop ends
			_forward = not _forward
		else:
			progress_ratio = 0

	if loop_type == LoopType.BackAndForth:
        # Change direction according to the _forward flag
		if _forward:
            # 0 to 1
			progress_ratio = clamp(_elapsed / loop_duration, 0, 1)
		else:
            # 1 to 0
			progress_ratio = clamp(1.0 - (_elapsed / loop_duration), 0, 1)
	else:
		progress_ratio = clamp(_elapsed / loop_duration, 0, 1)
Why not just use Tweens to drive progress_ratio?
The first implementation for the enemy movement used Tweens to do it and allow for easings on start/end of the movement, also animating the progress_ratio property; but when using custom_step() to set a different start position for the tween the timing of the movement was off. As the deadline was already close, I could not spend the time to research if that is a Tween bug or not, so I just decided to change to the linear implementation. Maybe in the future I should make a test project reproducing this behaviour to properly report this.
Dialogs
I've been wanting to make a more dynamic dialog system for a long time now, and this game seemed perfect to do it. This is the system in action:
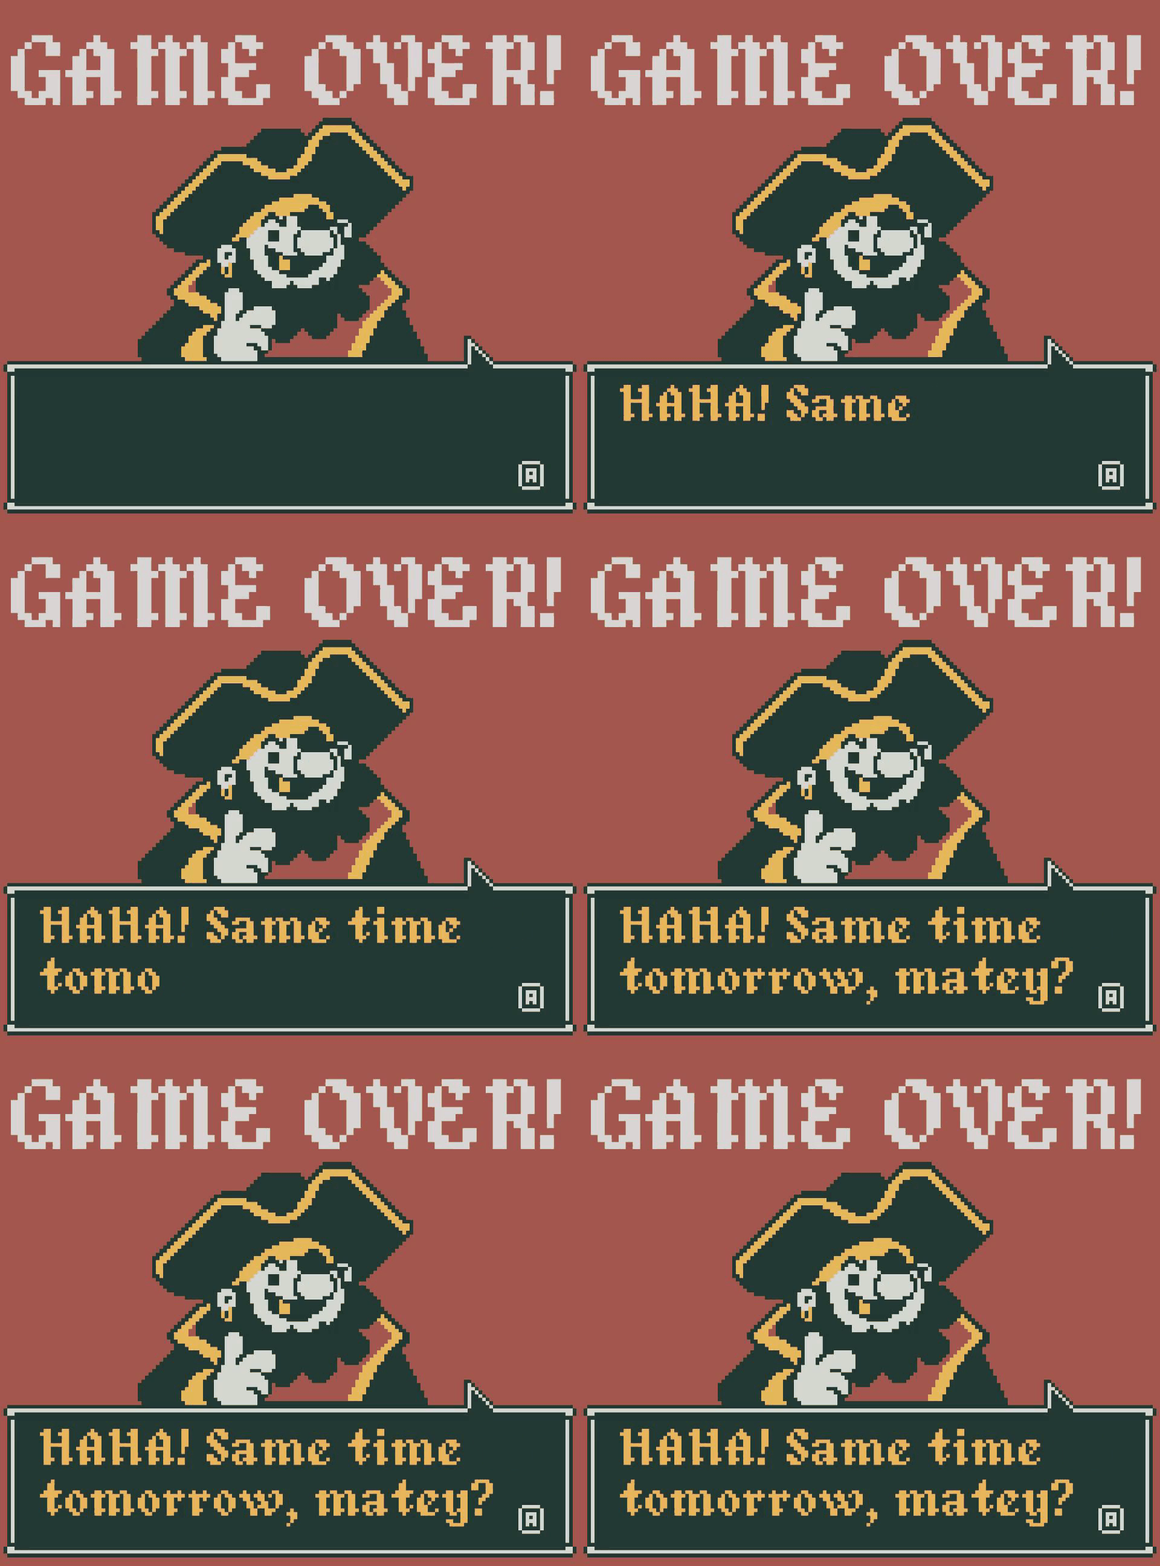
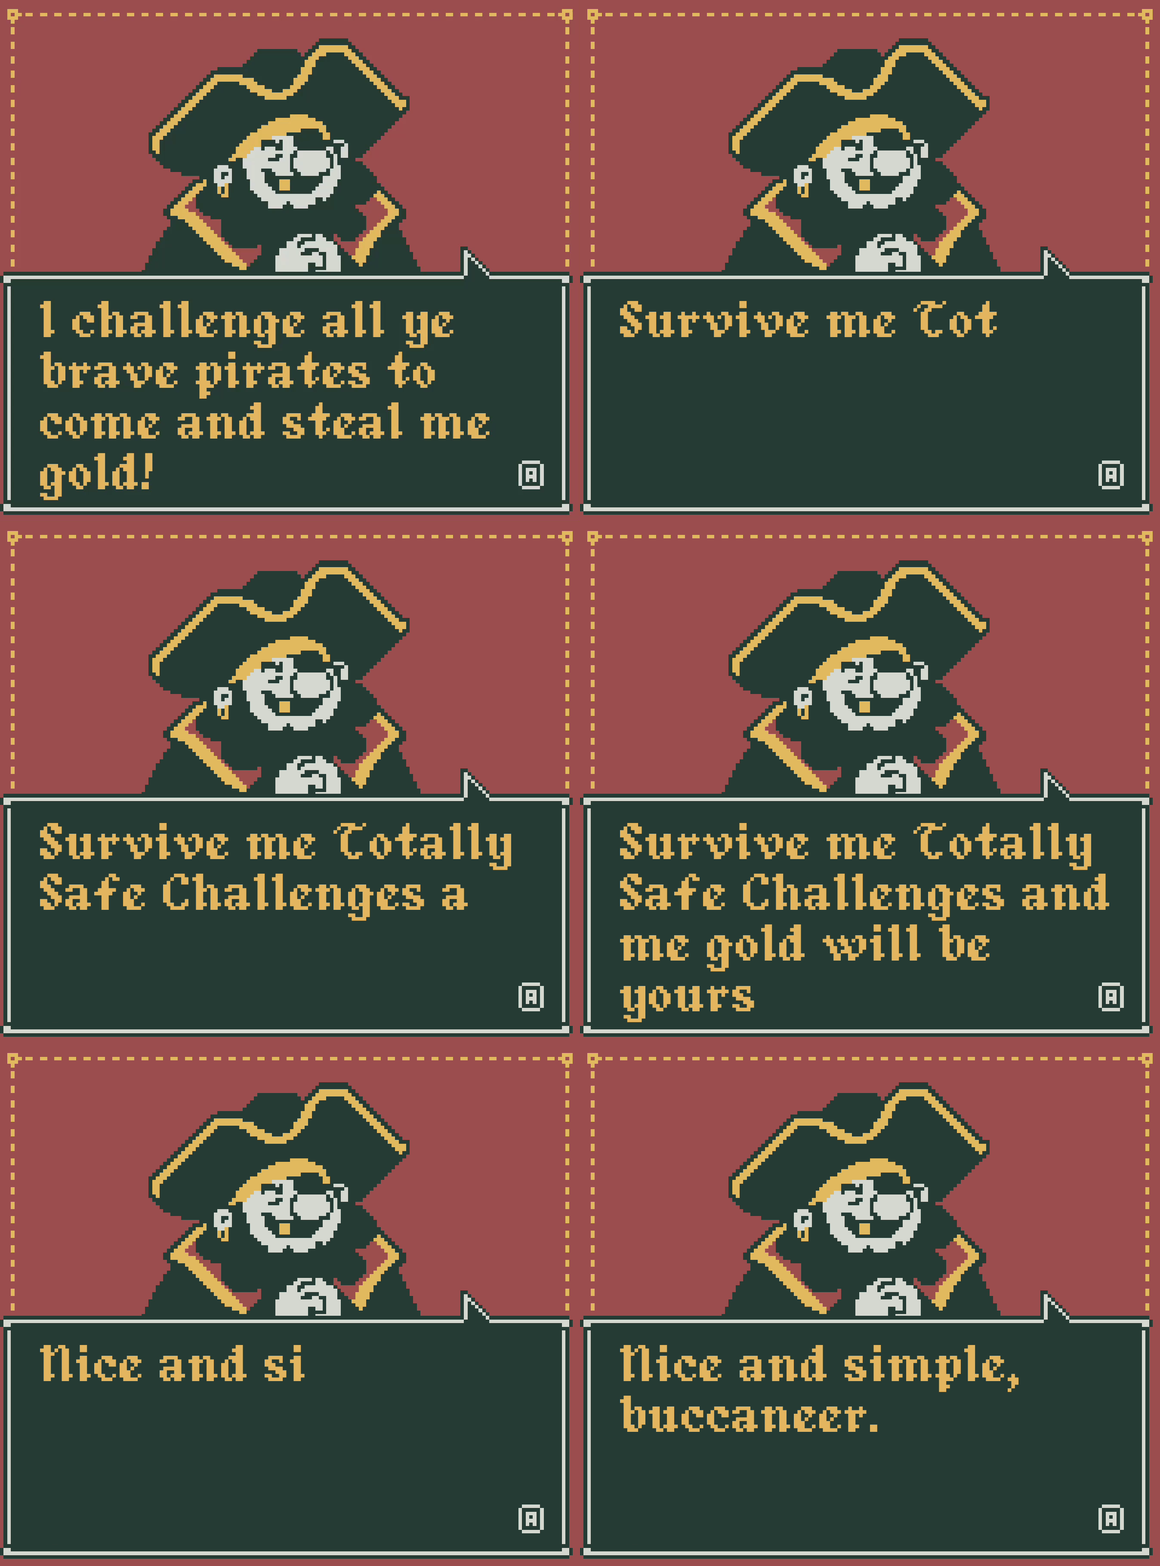
Dialog system examples
The dialog system implemented in a component called CaptainTalk with a RichTextLabel and a Sprite2D for the text and character, respectively, and a list of custom resources called DialogLines that contains the actual content that should be displayed. Each line stops at the end and waits for the player to press A to advance.
As seen below, the DialogLine instance has the portrait and the text to be shown, along with the talk bits (the character "voice"), a optional offset for the portrait position and the timing of each character.
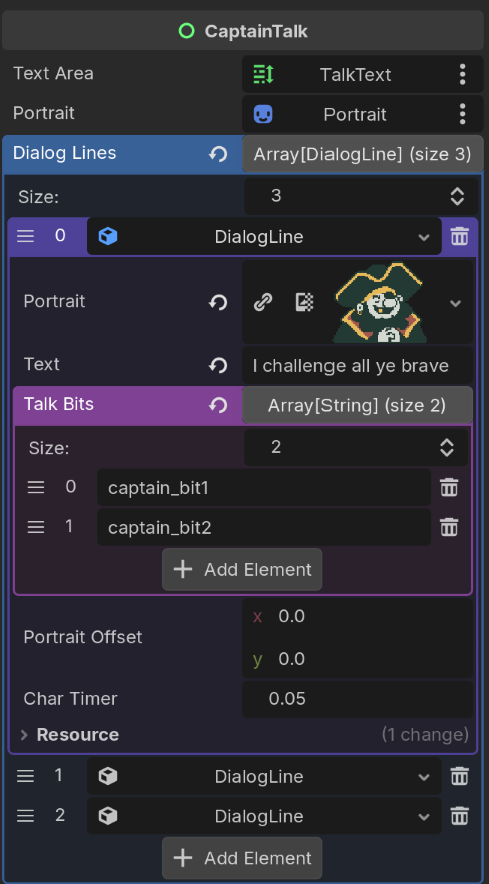
These are the two characters of the game in action, each with their own "voice":
The characters animation and talk bits are controlled separately each with their own Tweens, which are kept in sync for everything to work as intended. This is the code that play each talk line:
func _talk_line(index):
	stop_all_tweens()
	text_area.text = dialog_lines[index].text
	text_area.visible_ratio = 0.0
	_line_duration = dialog_lines[index].char_timer * dialog_lines[index].text.length()
	portrait.texture = dialog_lines[index].portrait
	portrait.position = _portrait_position + dialog_lines[index].portrait_offset

    # There is no easy way to detect if a char was added to the RichTextLabel,
	# so we'll run a separated tween synchronized with the first one for the talk bits.
    # Characters tween: just animate the visible_ratio property from 0 to 1
    # on the line duration; The RichTextLabel does the rest
	_dialog_tween = create_tween()
	_dialog_tween.tween_property(text_area, "visible_ratio", 1.0, _line_duration)
	_dialog_tween.play()

    # Talk bits tween: The Tween is just a timer which plays a talk bit at each
    # loop, using the char count as the loop count.
	_audio_tween = create_tween()
	_audio_tween.tween_interval(dialog_lines[index].char_timer)
	_audio_tween.loop_finished.connect(func(_loop):
        G.audio.play_talk_bit(dialog_lines[index].talk_bits.pick_random()))
	_audio_tween.set_loops(dialog_lines[index].text.length())
	_audio_tween.play()
The reason for using these two Tweens is that I wanted the talk bit to play at each character added, and as I was using the visible_ratio to show the characters one by one, there was no quick way to detect each character. So, the solution was to use the second Tween as a fancy timer - it plays a sound bit at the end of the each loop, with the loop quantity set to the character count.
Maybe this is not the best way to do it and the sync may be off on some parts, but it is good enough for now.
About other parts of the game
These three game aspects that I discussed above are the ones I personally consider more interesting to talk about. Some other parts are described below:
- The Player node is a CharacterBody2D allowing for top-down movement, and also a AnimatedSprite2D with a script that chooses the correct animation based on the player velocity.
- The Globals script (which is the node G on the running game) holds the current game state and references to the GameManager, InputComponent and AudioManager, so these instances can be referred anywhere on the code. This may not be the best solution from an software engineering viewpoint, but then again it is a quick and effective solution for a small game.
- Pause is implementing by just setting the
process_modeof the SceneRoot and the Music node of the AudioManager toPROCESS_MODE_DISABLED, effectively pausing the game from the player viewpoint. This is one of the advantages of using a single scene for the game and leaving the actual level under SceneRoot. The pause/unpause command is read directly by the GameManager, which handles theprocess_modechange on the required nodes.
Conclusion
Besides some issues with some implementations, a lot of things just worked on Godot – the core mechanics were solved in a matter of hours and the game was practically done a day before the deadline – and the iteration was fast: from changing the code to see it running on the browser it was a matter of seconds, something that just wasn't possible with Unity.
In the end, I had a great time implementing everything and also learned a lot on the process, already applying some of the lessons learned on other projects.
Also, GDScript is a nice language, and although it lacks some features of more "heavy" languages (i.e. encapsulation), it's nothing that following a more strict code style and some conventions cannot solve; its simplicity and engine integration are more than reason enough to keep using it.
So, I hope that this deep dive helped to shine some light on how things were made in the game And I cannot wait for the next GBJAM!